Yealink Telefoonhandleiding
Handmatige provisioning voor Yealink -telefoons


Dit artikel bevat stappen voor het handmatig inrichten van uw Yealink -apparaat.
1. Meld u aan bij de RingCentral-beheerportaal .
2. Van de Beheerportaal , navigeer naar Gebruikers > Gebruikerslijst > Gebruikers met extensies .
3. Klik Gebruiker toevoegen . De Gebruikers toevoegen venster verschijnt.
4. Selecteer een Locatie uit de vervolgkeuzelijst in Kantoorgebruiker typ en klik vervolgens Selecteer .
5. Vul de basisinformatie over de gebruiker in. Unieke e-mailadressen vereisen is standaard aangevinkt. U kunt het uitvinken als u gebruikers niet per e-mail wilt uitnodigen en andere gebruikersinstellingen wilt gebruiken.
6. Als u meer gebruikers wilt toevoegen, voert u het aantal in het daarvoor bestemde veld in en klikt u vervolgens op Toevoegen .
Opmerking : U kunt maximaal 24 extra gebruikers toevoegen (25 gebruikers tegelijk). U kunt ook op het duplicaatpictogram helemaal rechts klikken om een nieuwe rij te maken en de selectiedetails te behouden. Alle details behalve de voornaam, achternaam en e-mailadres worden opgenomen.

7. Onder Telefoon , selecteer Neem uw eigen apparaat mee.
8. Onder Nummer Gebruik het vervolgkeuzemenu om een nummer te selecteren dat aan uw Yealink -apparaat moet worden toegewezen.
9. Klik Klaar nadat u het nummer hebt geselecteerd.
10. Klik Volgende .
11. Kies hoe u de nieuwe gebruiker wilt instellen.
Na de laatste stap voor het toevoegen van een gebruikersextensie, ziet u de volgende instellingsopties om de gebruiker te onboarden.
• Uitnodiging verzenden: Stel een gebruiker in door een welkomstmail met een activeringslink te verzenden.
• Activeren door referenties toe te wijzen: Stel een gebruiker in en activeer deze door referenties te geven. Er wordt geen welkomstmail verzonden.
• Later activeren: Stel nu een gebruiker in, maar activeer deze op een later tijdstip. Er worden geen welkomstmails of meldingen verzonden.
Een uitnodiging naar een gebruiker sturen
1. Selecteer Uitnodiging verzenden onder Installatieoptie .
2. Klik op Rol bewerken onder Toegewezen rol als u de machtigingen van de gebruiker wilt wijzigen.
3. Klik Volgende . De Gebruikers toevoegen - Bevestigen venster verschijnt.
4. Controleer de kosten en vink het bevestigingsvakje onderaan aan.
5. Klik Volgende .
Activeren door het toewijzen van referenties aan een gebruiker
1. Selecteer Activeren door referenties toe te wijzen onder Installatieoptie .
2. Vul de gegevens in onder Credential:
• Wachtwoord
• Voer wachtwoord opnieuw in
• PIN
• PIN-code opnieuw invoeren
• Beveiligingsvraag
• Antwoord
3. Vink het vakje aan voor Tijdelijk wachtwoord om gebruikers te vragen hun wachtwoord opnieuw in te stellen wanneer ze zich voor de eerste keer aanmelden (optioneel).
4. Onder Noodadres , klik Toevoegen naast de naam van gebruikers met apparaten.
5. Vul de info in voor het noodadres. Klik Klaar .
6. Klik op Rol bewerken onder Toegewezen rol als u de machtigingen van de gebruiker wilt wijzigen.
7. Klik Volgende . Als je klikt Volgende Als u de stappen 4-5 niet uitvoert, verschijnt er een prompt voor Noodadres ontbreekt . U kunt klikken Terug naar Noodadres toevoegen of Ja om door te gaan zonder een noodadres. Als u op dit punt geen noodadres toevoegt, moeten de gebruiker(s) hun noodadres toevoegen wanneer ze inloggen op hun RingCentral online account of RingCentral app.
8. Controleer de kosten en vink het bevestigingsvakje onderaan aan.
9. Klik Volgende .
Gebruiker op een later tijdstip activeren
1. Selecteer Later activeren onder Installatieoptie .
2. Klik op Rol bewerken onder Toegewezen rol als u de machtigingen van de gebruiker wilt wijzigen.
3. Klik Volgende . De Gebruikers toevoegen - Bevestigen venster verschijnt.
4. Controleer de kosten en vink het bevestigingsvakje onderaan aan.
5. Klik Volgende .
1. In de Beheerportaal , navigeer naar Telefoonsysteem > Telefoons en apparaten > Gebruikerstelefoons .
2. Klik op de naam van de gebruiker aan wie u de Yealink -telefoon wilt toewijzen.
3. Klik Opzetten en inrichten .
4. Selecteer de Andere telefoons tabblad, klik vervolgens op Selecteer .
5. Selecteer uw gewenste Uitgaande proxy Klik vervolgens in het vervolgkeuzemenu op Kopiëren in de rechterbovenhoek om de inrichtingsgegevens in een kladblok te plakken.
Om uw Yealink -apparaat handmatig te provisioneren, hebt u een computer nodig met toegang tot hetzelfde subnet als waarop uw Yealink -telefoon draait. U kunt fysiek ter plaatse zijn, of u kunt een VPN-tunnel, externe verbinding, etc. gebruiken.
1. Haal het IP-adres van uw Yealink -telefoon op .
2. Open een webbrowser en voer het IP-adres van de telefoon in de adresbalk in.
3. Meld u aan bij de web-UI van de telefoon. De standaardgebruikersnaam is beheerder , en het standaardwachtwoord is beheerder .
4. Navigeer naar Account > Registreren .
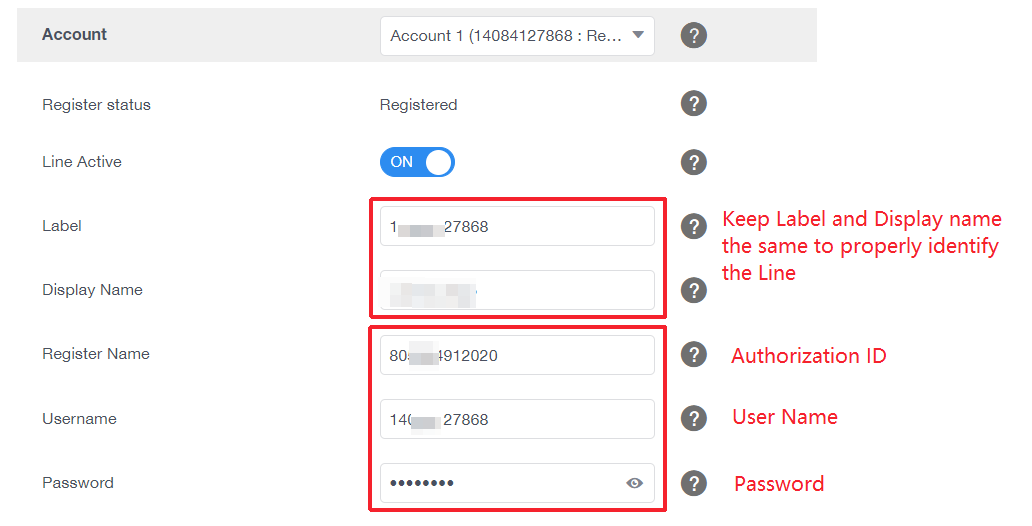
5. Ontvang de provisioning-details en vul de informatie in de volgende velden in:
A. Lijn Actief : Instellen op Ingeschakeld .
B. Label : Geef de lijn een naam die u wilt gebruiken om de lijn te identificeren.
C. Weergavenaam : Geef de lijn een naam die u wilt gebruiken om de lijn te identificeren.
D. Naam registreren : Voer de Autorisatie-ID uit de provisioning-details.
en Gebruikersnaam : Voer de Gebruikersnaam uit de provisioning-details.
F. Wachtwoord : Voer de Wachtwoord uit de provisioning-details.
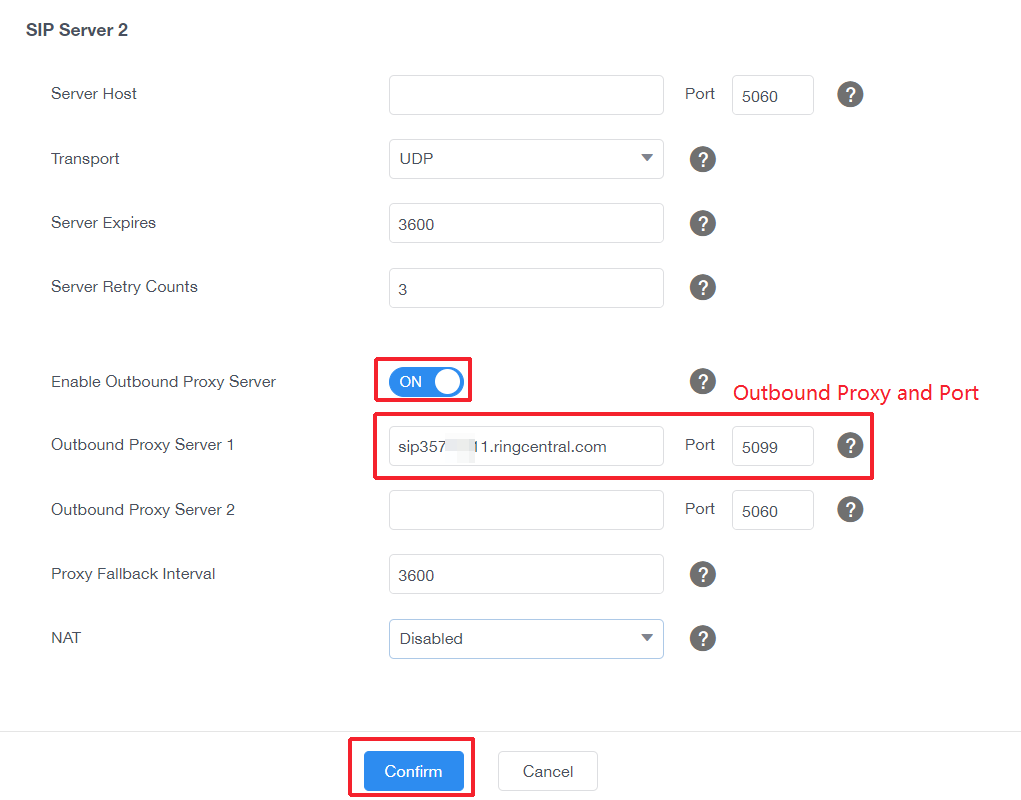
G. Sip-server 1 – Serverhost : Voer de SIP-domein , waarbij u de URL in het eerste vak invoert en de poort in het tweede vak.
H. Vervoer : Als beveiligd spraaktransport (TLS1.2) wordt gebruikt, kan het zijn dat u geen oproepen kunt verzenden of ontvangen. Stel dit in op Nee , ingesteld op TCP of UDP.
i. Uitgaande proxyserver inschakelen : Instellen op Ingeschakeld .
J. Uitgaande proxyserver 1 : Voer de Uitgaande proxy , waarbij u de URL in het eerste vak invoert en de poort in het tweede vak.
6. Klik Bevestigen .
De pagina zou vernieuwd moeten worden. Registratiestatus zou moeten zeggen "Registreren" en dan na een paar seconden overschakelen naar "Geregistreerd".


Kosteneffectieve Wi-Fi IP-telefoonoplossing

Draadloos bereik van ongeveer 50 meter binnenshuis en tot 300 meter buitenshuis

Professioneel robuust telefoonsysteem voor uitdagende omgevingen

Elite desktoptelefoon voor managers en professionals

HD IP-conferentietelefoon voor onderweg en in overlegruimtes

Een veelzijdige kantoor telefoon en een voordelige WiFi IP telefoon
Neem contact met ons op
Neem contact met ons op voor productoffertes en installatieconsultaties. Wij zullen onmiddellijk een lokale dealer op de hoogte stellen om u nauwkeurige en efficiënte serviceoplossingen te bieden.


